 Unity
UnityUnity SDK
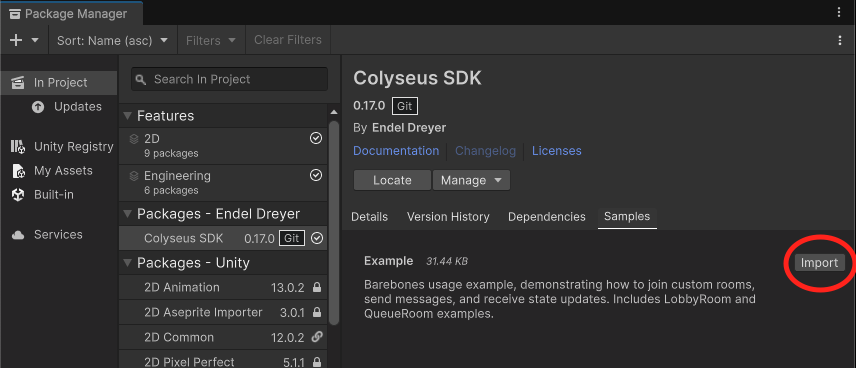
Install package
- Go to Window → Package Management → Package Manager. Click ”+” button, then select “Add package from git URL…”
- Enter Git URL:
https://github.com/colyseus/colyseus-unity-sdk.git#upm - Click “ADD”
Click to import the example project in order to test the built-in demonstration.
Testing from Unity Editor
Starting with Unity 6000.1.0b1, Unity integrates Multiplayer Play Mode, enabling you to test your Colyseus-based multiplayer game with multiple clients directly within the Unity Editor, without needing to build the application.
- See how to install Multiplayer Play Mode
- Alternatively, you can use ParrelSync for older versions of Unity.
SDK Example Project
The example project included in the SDK package does not contain any visual components or UI. It contains the majority of important method calls you would be using in a real-world application.
- Joining into a custom room with Messages and State Synchronization
- Joining into a LobbyRoom and listening to its messages
- Joining into a QueueRoom and listening to its messages
- Consuming a seat reservation from QueueRoom and joining into the match room
Running the test server locally
To run the test server locally, you will need to run the following commands in your terminal:
git clone https://github.com/colyseus/sdks-test-server
cd sdks-test-server
npm install
npm start
You can see the source code for the test server here.
You should be able to see the server running at http://localhost:2567, and the example project will be able to connect to it.
Quick Example
This example shows how to connect to a room, listen for state changes via Callbacks, and send messages.
using UnityEngine;
using Colyseus;
using Colyseus.Schema;

public class NetworkManager : MonoBehaviour
{
    Client client;
    Room<MyRoomState> room;

    async void Start()
    {
        client = new Client("ws://localhost:2567");

        room = await client.JoinOrCreate<MyRoomState>("my_room");
        Debug.Log("Joined room: " + room.Id);

        // Get state callbacks handler
        var callbacks = Callbacks.Get(room);

        // Listen for changes on a state property
        callbacks.Listen(state => state.currentTurn, (currentValue, previousValue) => {
            Debug.Log($"Turn changed: {previousValue} -> {currentValue}");
        });

        // Listen for players being added
        callbacks.OnAdd(state => state.players, (sessionId, player) => {
            Debug.Log($"Player joined: {sessionId}");

            callbacks.Listen(player, p => p.hp, (currentHp, previousHp) => {
                Debug.Log($"Player {sessionId} hp: {currentHp}");
            });
        });

        // Listen for players being removed
        callbacks.OnRemove(state => state.players, (sessionId, player) => {
            Debug.Log($"Player left: {sessionId}");
        });

        // Send a message to the server
        room.Send("move", new { x = 10f, y = 20f });

        // Listen for messages from the server
        room.OnMessage<string>("chat", (message) => {
            Debug.Log("Chat: " + message);
        });
    }

    async void OnDestroy()
    {
        if (room != null) await room.Leave();
    }
}
SDK API
Navigate to the Client SDK for API Reference, and select the C# (Unity) tab.
State Schema Codegen
For compiled languages like C#, you need to generate client-side schema classes that match your server’s state structure. Run the following command from your server directory:
npx schema-codegen src/rooms/schema/* --csharp --output ../Assets/Scripts/States/See the full State Schema Codegen documentation for more options and details.
DynamicSchema (Skip Code Generation)
If you want to skip the code generation step entirely, you can use DynamicSchema instead of generated schema classes. DynamicSchema builds its type metadata at runtime from the server handshake, so no generated files are needed.
using UnityEngine;
using Colyseus;
using Colyseus.Schema;

public class NetworkManager : MonoBehaviour
{
    Client client;
    Room<DynamicSchema> room;

    async void Start()
    {
        client = new Client("ws://localhost:2567");

        room = await client.JoinOrCreate<DynamicSchema>("my_room");
        Debug.Log("Joined room: " + room.Id);

        // Access state fields dynamically
        var players = room.State.Get<MapSchema<DynamicSchema>>("players");
        var self = players[room.SessionId];
        var hp = self.Get<int>("hp");

        // Callbacks use string-based property names instead of expressions
        var callbacks = Callbacks.Get(room);

        callbacks.Listen<string>("currentTurn", (currentValue, previousValue) => {
            Debug.Log($"Turn changed: {previousValue} -> {currentValue}");
        });

        callbacks.OnAdd<DynamicSchema>("players", (sessionId, player) => {
            Debug.Log($"Player joined: {sessionId}");

            // Access nested collections
            var items = player.Get<ArraySchema<DynamicSchema>>("items");
        });

        callbacks.OnRemove<DynamicSchema>("players", (sessionId, player) => {
            Debug.Log($"Player left: {sessionId}");
        });
    }

    async void OnDestroy()
    {
        if (room != null) await room.Leave();
    }
}DynamicSchema trades compile-time type safety for convenience. You won’t get IDE autocomplete on state fields, and type errors will only surface at runtime. For production projects, Schema Codegen is recommended.
Message Types Codegen
The same schema-codegen command also generates C# classes for any TypeScript interface containing "Message" in its name. This allows you to use strongly-typed message objects on the client side.
For example, given the following server-side code:
interface MoveMessage {
  x: number;
  y: number;
}

// ...

messages = {
  move: (client: Client, message: MoveMessage) => {
    // handle move
  }
}
Running the codegen command will automatically generate a matching C# class:
public class MoveMessage {
    public float x;
    public float y;
}
You can then use these classes when sending and receiving messages on the Unity client:
room.Send("move", new MoveMessage() { x = 1.0f, y = 2.0f });The same applies to messages sent from the server to the client. For example, given a server-side interface:
interface EventMessage {
  type: string;
  data: string;
}

// ...

onJoin(client: Client) {
  client.send("event", { type: "welcome", data: "Hello!" } as EventMessage);
}
You can listen for it on the Unity client with the generated type:
room.OnMessage<EventMessage>("event", (message) => {
    Debug.Log(message.type);
    Debug.Log(message.data);
});
Debugging
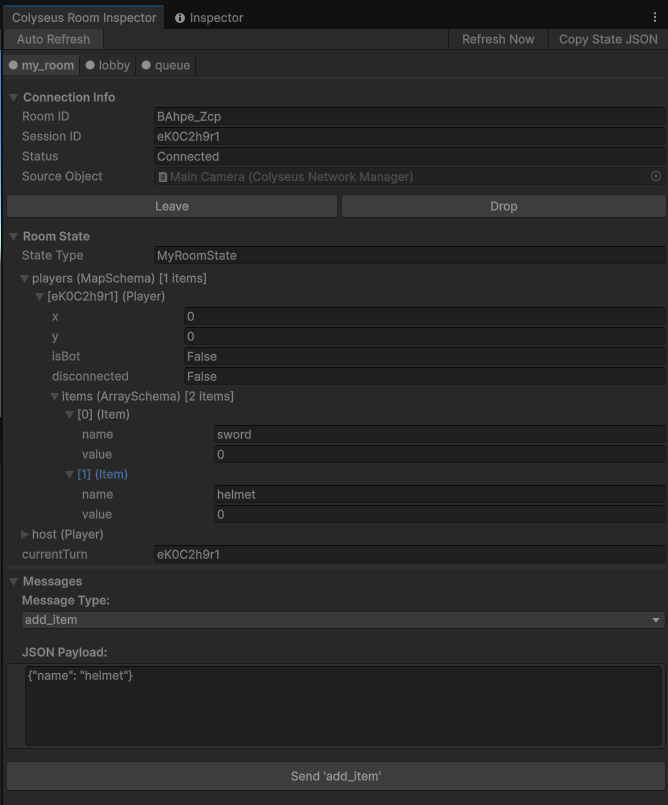
Editor Debug Panel (experimental)
The editor debug panel allows you to inspect the room state and messages in real-time during development, simulate high latency conditions, connection drops, and more.
You can enable the Editor Debug Panel at Window → Colyseus → Room Inspector
Breakpoints
If you set a breakpoint in your application while the WebSocket connection is open, the connection will be closed automatically after 3 seconds due to inactivity. To prevent the WebSocket connection from dropping, use pingInterval: 0 during development:
import { defineServer } from "colyseus";
import { WebSocketTransport } from "@colyseus/ws-transport";

const server = defineServer({
    // ...
    transport: new WebSocketTransport({
        pingInterval: 0, // <--- HERE
    }),
    // ...
});
Make sure to have a pingInterval higher than 0 on production. The default pingInterval value is 3000.
 React
React MonoGame